restdb.io Pages can serve any content type (HTML, JSON, CSS, RSS, text etc) through an URL endpoint directly from your database.
They are perfect to use for:
You code the view templates using server-side HandlebarsJS tags together with your content type. Pages can also act as components in other Pages by including one in another (see the #include tag below).
For a good example of a site created entirely with Pages, visit http://restdb.site. You can view (and steal) the source code to see how things are done.
The output from a Handlebars template is injected in the HTML (or other content type) on the server before it is sent to the browser. Pages rendered with server templates are fast and demands very few resources from your browser.
General HandlebarsJS tags you can use with Pages can be found here.
restdb.io specific Handlebars-tags and helpers are:
| Helper | Description |
|---|---|
| context | Run database queries and bind data to the Page view context |
| include | Reuse another Page as a fragment |
| inherit | Inherit from a master page layout |
| block | Place output in master page layout block |
| ifCond | Logic statement |
| tojson | Output encoded JSON |
| rawjson | Output unencoded JSON |
| moment | Date functions from the moment.js library |
| auth | Password protect pages |
| trimString | Substring |
| fixedNumber | Number decimal format |
| _ | String functions from lodash.com library |
| markdown | Render text as Markdown |
| sortBy | Sort an array in ascending order |
| sortByDesc | Sort an array in decending order |
| parseInt | Parse string to an Integer |
| switch | Switch case statement |
| codehook | Page Codehooks, serverless Javascript functions |
The various helpers are explained below.
The #context helper tag defines the data you can display on a Page. It could be a plain JSON object (great for testing), but the main use case is to run one or several database queries and make the result available through Handlebars tags.
In the HTML example below, we fetch data from one collection (contacts), using a query that will give us contacts of category 'customer'.
The query and hints part of the definition are the same we use for the REST API queries. Note that query is required, hints is optional. See the "Querying with the API" docs for details.
    {{#context}}
    {
      "mycust": {
          "collection": "contacts",
          "query": {"category": "customer"},
          "hints": {"$orderby": {"name": 1}}}
      }
    }
    {{/context}}

    <html>
        <body>
            <h1>My customer contacts</h1>
            <ul>
                {{#each mycust}}
                <li>
                    {{name}} {{phone}}
                </li>
                {{/each}}
            </ul>
        </body>
    </html>
Creating a data view of the same data in JSON is simple. You just change the content type of the Page to application/json (in the settings menu of the Page) and write the content in the appropriate format (JSON).
    {{#context}}
    {
      "mycust": {
          "collection": "contacts",
          "query": {"category": "customer", "_createdby":"{{user}}"},
          "hints": {"$orderby": {"name": 1}}}
      }
    }
    {{/context}}
    [
      {{#each mycust}}
      {
        "name":"{{name}}",
        "phone":"{{phone}}"
      }
      {{#unless @last}}
      ,
      {{/unless}}
      {{/each}}
    ]
Tip: use {{{tojson mycust}}} to inspect the JSON data or {{{rawjson mycust}}} to output the unescaped JSON data into the page html (note the three brackets) .
To include one Page in another we just use the include tag with the name of the Page we wish to include. This makes it easy to reuse HTML partials across many pages.
    <h1>My page title</h1>
    {{include "page-name"}}
    <p>Some text ...
You can also include content from static files with the static parameter:
{{include "/folder/file.html" static=true}}
The #inherit tag lets you reuse a complete page layout by replacing only #block inside the "master template". First, create a "master page", name it what you like, e.g. masterpage.
    <!-- The masterpage -->
    <html>
        <body>
            <h2>{{{title}}}</h2>
            <p>{{{content}}}</p>
        </body>
    </html>
Next, create a "content page" that will reuse the "master page" layout, name it what you like, e.g. contentpage.
    <!-- The content page -->
    {{#inherit "masterpage"}}
        {{#block "title"}}
        The page title
        {{/block}}

        {{#block "content"}}
        The page content here.
        <hr>
        Something else here.
        {{/block}}

    {{/inherit}}
The output from this page will now be merged into the "master template" to produce the following output.
    <!-- The output html -->
    <html>
        <body>
            <h2>The page title</h2>
            <p>The page content here.
        <hr>
        Something else here.
    </p>
        </body>
    </html>
This tag will render the content as HTML. The text content must be written in markdown syntax.
{{#each article}}
  {{markdown content}}
{{/each}}
Use this tag to do logical comparisons. The following operators are supported:
| Operator | Description |
|---|---|
| "==" | Equals |
| "===" | Equals |
| "!==" | Not equal |
| "<" | Less than |
| "<=" | Less than or equal |
| ">" | Greater than |
| ">=" | Greater then or equal |
| "&&" | And |
| "||" | Or |
| "%" | Modulus |
| "~" | Regular expression match |
Example statement using the Equals operator:
{{#ifCond value "===" value2}}
    Values are equal!
{{else}}
    Values are different!
{{/ifCond}}
Call a utility function from the Lodash library.
For example rounding a number:
{{_ 'round' customer.salary 2}}
This tag will output a context variable directly to JSON.
{{{tojson projects}}}
This tag will output a context variable unescaped directly to JSON.
{{{rawjson projects}}}
Note that this helper does not use the hash symbol (#) and does not need an end tag. The variable (here: datereceived) must be a valid date.
{{#each application}}
  <p>{{subject}} - {{moment datereceived format="DD/MM/YYYY"}}</p>
{{/each}}</pre>
More examples of MomentJS Handlebars formatting can be found here. You can also check out the MomentJS site.
This tag instructs the server to require an authenticated user.
The example below shows hot to protect a page with a simple username and password.
{{#auth}}
{"password": "secret", "user": "jane"}
{{/auth}}
...
A more elaborate example using a database Collection to authenticate users against.
{{#context}}
{
    "user": {
        "collection": "myusers",
        "query": {"username": "{{credentials.name}}", "password": "{{credentials.pass}}"}
    }
 }
{{/context}}

{{#auth}}
{
    "password": "{{user.0.password}}", "user": "{{user.0.username}}"
}
{{/auth}}
...
Output a substring from another.
{{trimString str 0 50 '..'}}
Fixed number of decimals for an integer or float.
{{fixedNumber anumber 2}}

// e.g. 5 => 5.00
Replace all occurences of a string or a regular expression in a variable
{{replaceAll myvariable '-' '_'}}
Sort an array in ascending order. Consider this example where a customer collection has a productlist as an embedded array.
{{#context}}
{
    "customers": {
        "collection": "customers",
        "query": {},
        "hints": {"$orderby": {"Name": 1}}
    }
 }
{{/context}}

<html>
    <body>
        {{#each customers}}
            <p>
            {{this.Name}}
            {{#sortBy this.productlist "Price"}}
                {{#each .}}
                    <div style="margin-left: 20px;">
                        ${{Price}}, {{this.[Product Title]}}
                    </div>
                {{/each}}
            {{/sortBy}}
            </p>
        {{/each}}
    </body>
</html>
Example output:
Bogisich Inc
    $500, Apple II plus
    $560, Apple II
    $700, Apple Lisa
Brakus LLC
    $450, Apple IIe
    $500, Apple II plus
    $700, Apple Lisa
    $999, Apple I
    $1150, Mackintosh SE 30
Sort an array in descending order.
See example above and replace sortBy with sortByDesc
Parse a string to an Integer. Second parameter outputs as default value if first parameter is not a valid string.
{{parseInt astring -1}}
Switch case statement. Multiple and nested expressions supported.
{{#each orders}}
        <br/>
        Order is shipped to
        {{#switch ShipCity}}

                {{#case 'Reims'}}
                        Home in <strong>{{ShipCity}}</strong>.
                {{/case}}

                {{#case 'Graz' 'rue du Commerce'}}
                        Perfumes region in {{ShipCity}}.
                {{/case}}

                {{#default}}
                        Somewhere else.
                {{/default}}

        {{/switch}}
{{/each}}
Predefined variables you can use in restdb.io Pages are:
{{root}}
<link href="{{root}}/mycss" rel="stylesheet">{{user}}
{{params}}
{{params.title}} references ...?title="the title"{{pathparams}}
"/contacts/:name" can retrieve the path parameter :name using {{pathparams.name}}.
Accessing the page with /contacts/john will put "john" into pathparams.name. Note that the page name MUST start with a slash '/' in order for this to work.{{credentials}}
#auth tag.{{db}}
{{settings}}
Sometimes it can be nice to use a restdb.io Collection to store sitewide settings. In this case it is awkward and unreadable to access these data from an array: {{settings.12.name}}. Instead you can map the result of a query to a hashmap as follows:
    {{#context}}
    {
      "settings": {
          "collection": "settings",
          "query": {},
           "as":{
                "type":"map",
                "key":"name"
            }
      }
    }
    {{/context}}
You can now access the settings like this: {{settings.title}}.
Note that the key field (here: name) should be set to be unique.
Page Codehooks are serverless Javascript functions that you can add to a Page to provide more control of page security, logic and dynamic content.
A Codehook is created as a separate Page with a content-type of text/javascript.
For example, lets create a new Page named ahook. The codehook runs each time a GETrequest is made. It adds some dynamic variables to a context propery which is returned from the function callback routine.
// Page codehook: ahook
const onGET = (request, response) => {
    response.end({
        status: 200,
        context: {
            question: "What's the answer?",
            answer: 42
        }
    });
}
Lets also make a new Page that uses the codehook from the example above.
<!-- Page that uses the codehook -->
{{#codehook code="ahook"}}
<html>
    <body>
        Hello page hook! <br>
        Question: {{question}} <br>
        Answer: {{answer}}
    </body>
</html>
{{/codehook}}
The Page output is shown below:
Hello page hook!
Question: What's the answer?
Answer: 42
The following variables returned from the codehook response.end function can be used:
const onGET = (request, response) => {
    response.end({
        status: /* 200 OK, 302 Redirect, 403 Not allowed, 500 Error etc. */,
        text: /* Text output directly into the Page, e.g. "Hello world!" */,
        json: /* JSON output directly into the Page, e.g. {"msg": "Hello world!"} */,
        headers: /* Append your own header values, e.g. {'x-myval': 42} */,
        message: /* For status codes 40x add message here, e.g. "403 Not allowed" */,
        redirect: /* Send to another URL, e.g. "https://restdb.io/docs" */,
        context: /* Add dynamic content variables to a Page, e.g. {"count": 300} */
    });
}
This example contains 3 Pages
auth-master for the master layout:<html>
<body>
<strong>{{{content}}}</strong>
<hr>
{{{data}}}
</body>
</html>
auth01.js// #!/javascript
// Trigger Codehook on GET requests
async function onGET(req, res) {
if (!req.headers.authorization) {
res.end({
headers: { 'WWW-Authenticate': 'Basic realm="Secret zone"' },
text: "Forbidden",
status: 401
})
return;
}
// verify auth credentials
const base64Credentials = req.headers.authorization.split(' ')[1];
const credentials = Buffer.from(base64Credentials, 'base64').toString('ascii');
const [username, password] = credentials.split(':');
// Query the users collection for a match on user/pass
const users = await db.get("/rest/users", {"username": username, "password": password});
// Fetch some data content
const verbs = await db.get("/rest/bs-verbs?sort=Verbs", {});
// log to the Rest inspector console
console.log(users, verbs);
if (users.length === 1) {
res.end({
"context": {"username": username, "verbs": verbs}
});
} else {
res.end({
headers: { 'WWW-Authenticate': 'Basic realm="Secret zone"' },
text: "User not found",
status: 401
})
}
}
auth01-sub for the content:<!-- Call Codehook for Page context and authentication -->
{{#codehook code="auth01.js"}}
<!-- use master page layout-->
{{#inherit "auth-master"}}
<!-- insert block of content in master page layout-->
{{#block "content"}}
<!-- access context data variables from Codehook-->
{{username}} knows about {{verbs.length}} verbs.
{{/block}}
<!-- insert block of data in master page layout-->
{{#block "data"}}
<!-- access another context data variable as an array of items-->
{{#each verbs}}
<p>{{this.Verbs}} ( {{this._id}} )</p>
{{/each}}
{{/block}}
{{/inherit}}
{{/codehook}}
Example verbatim html output from auth01-sub:
<!-- use master page layout-->

<html>
    <body>
       <strong>
            <!-- access context data variables from Codehook-->
            admin knows about 69 verbs.
</strong>
       <hr>
            <!-- access another context data variable as an array of items-->
            <p>aggregate ( 5dc1823bf766344300005151 )</p>
            <p>architect ( 5dc1823bf766344300005152 )</p>
...
Read more about serverless Codehooks here.
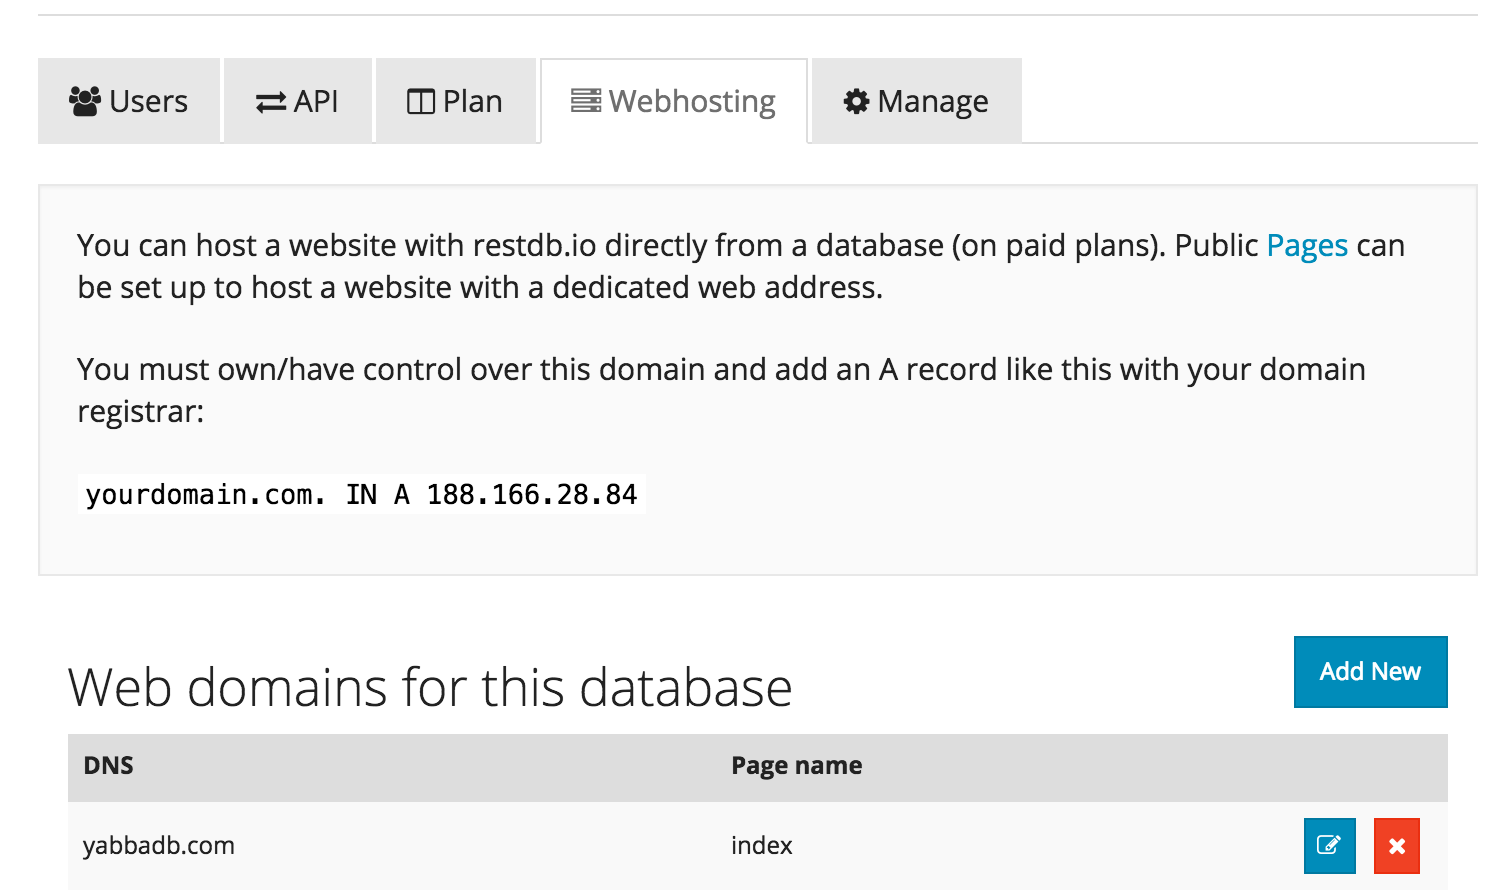
A restdb.io database with Pages can be used to host a site. To do this, you need to create at least one Page and make it public. Now, go to the "Users and Settings" for your database. There you'll find the "Webhosting" tab and the instructions for hosting your Pages. The "Page name" sets up the default landing page.