


The demo code is nothing fancy, but focuses on showing how to set up up your React application, and connect it to a real time data stream and a REST API.
Highlights
- Standard web browser Eventsource API to connect to the restdb.io real time API
- Axios for communication with the REST API
- Dump of Nasdaq stock data stored in the database
- Deploy the finished application to a restdb.io server
The screen shot below shows what the finished app looks like:
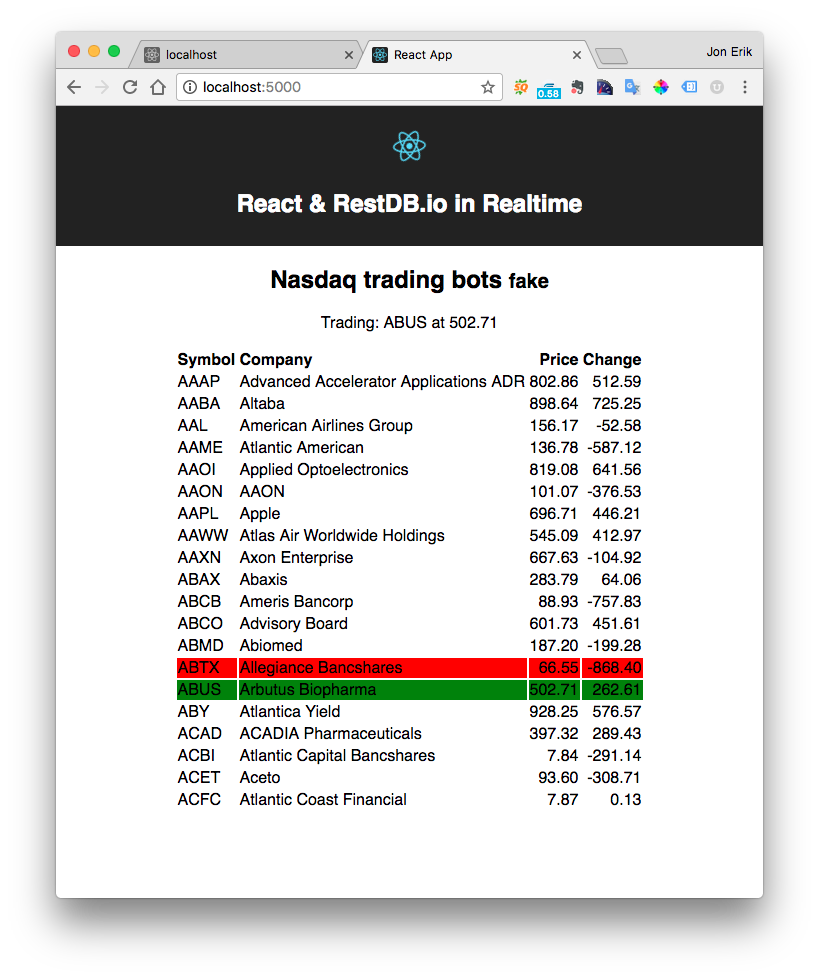
You can check out a live demo at this link.
Lets look at how this application is made.
Create the project
Create a directory and install the wonderfully easy-to-use npm package create-react-app.
mkdir react-demo
cd react-demo/
npm install -g create-react-app
create-react-app realtime-react
cd realtime-react
Utilities
In addition to React we need Axios for REST communication and Lodash for convenience.
# the -S option adds it to our package.json project file
npm install axios -S
npm install lodash -S
Create the database
After creating a new database in restdb.io, we begin with importing data from a local csv file downloaded from the web:
name,symbol,open,high,low,close,net chg,percent chg,volume,52 wk high,52 wk low,div,yield,P-E,ytd percent chg
1st Constitution Bancorp,FCCY,17.30,17.50,17.25,17.25,...,...,"2,900",20.85,11.83,0.20,1.16,15.83,-7.75
1st Source,SRCE,48.11,48.89,48.02,48.67,0.44,0.91,"31,238",50.77,31.88,0.76,1.56,21.07,8.98
2U,TWOU,45.23,46.37,45.08,46.24,1.30,2.89,"280,877",48.40,29.23,...,...,...,53.37
...
Because these data are from the Nasdaq stock exchange, we import the data into a new collection that we named nasdaq.
After the import we can look at the data inside in the restdb.io data manager:
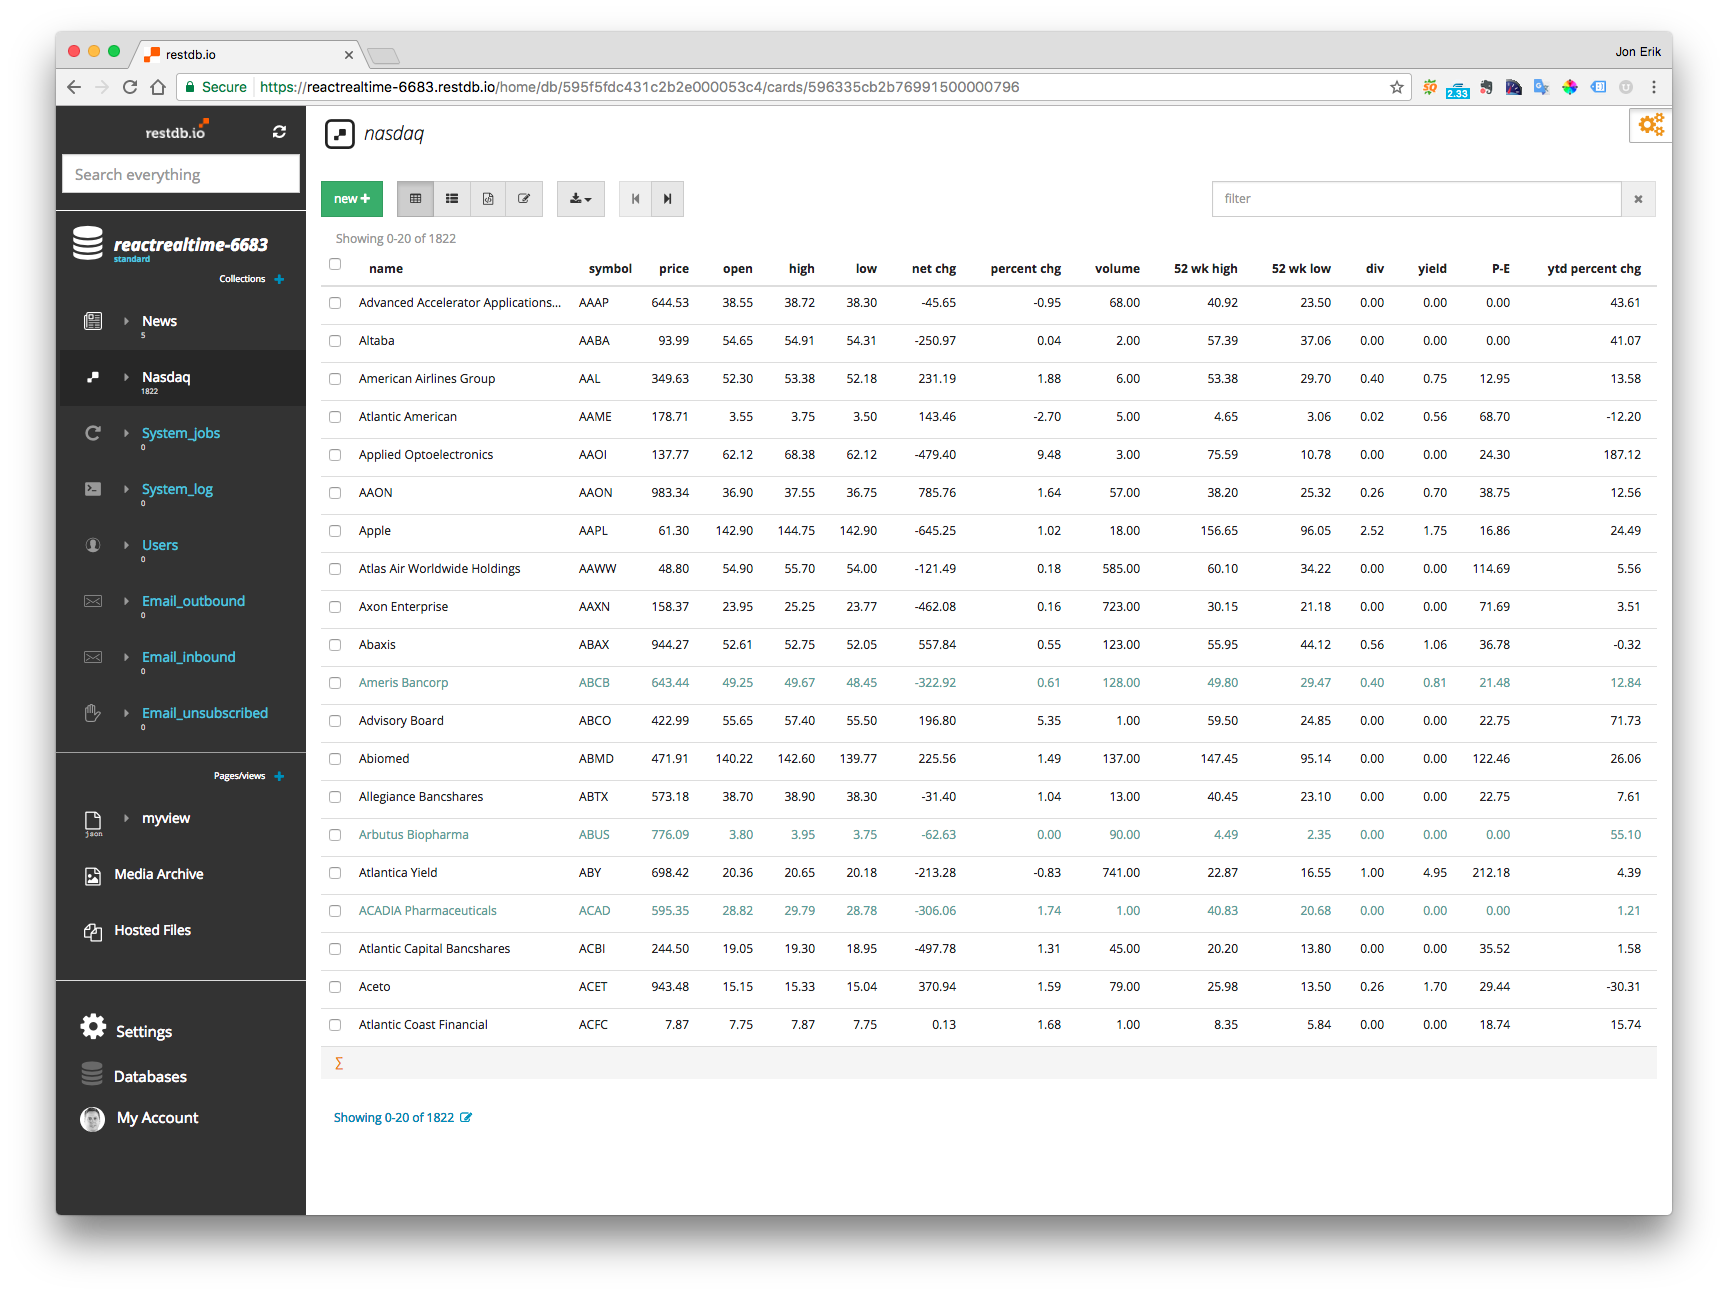
Yay! The data schema has been created automatically from the import data:
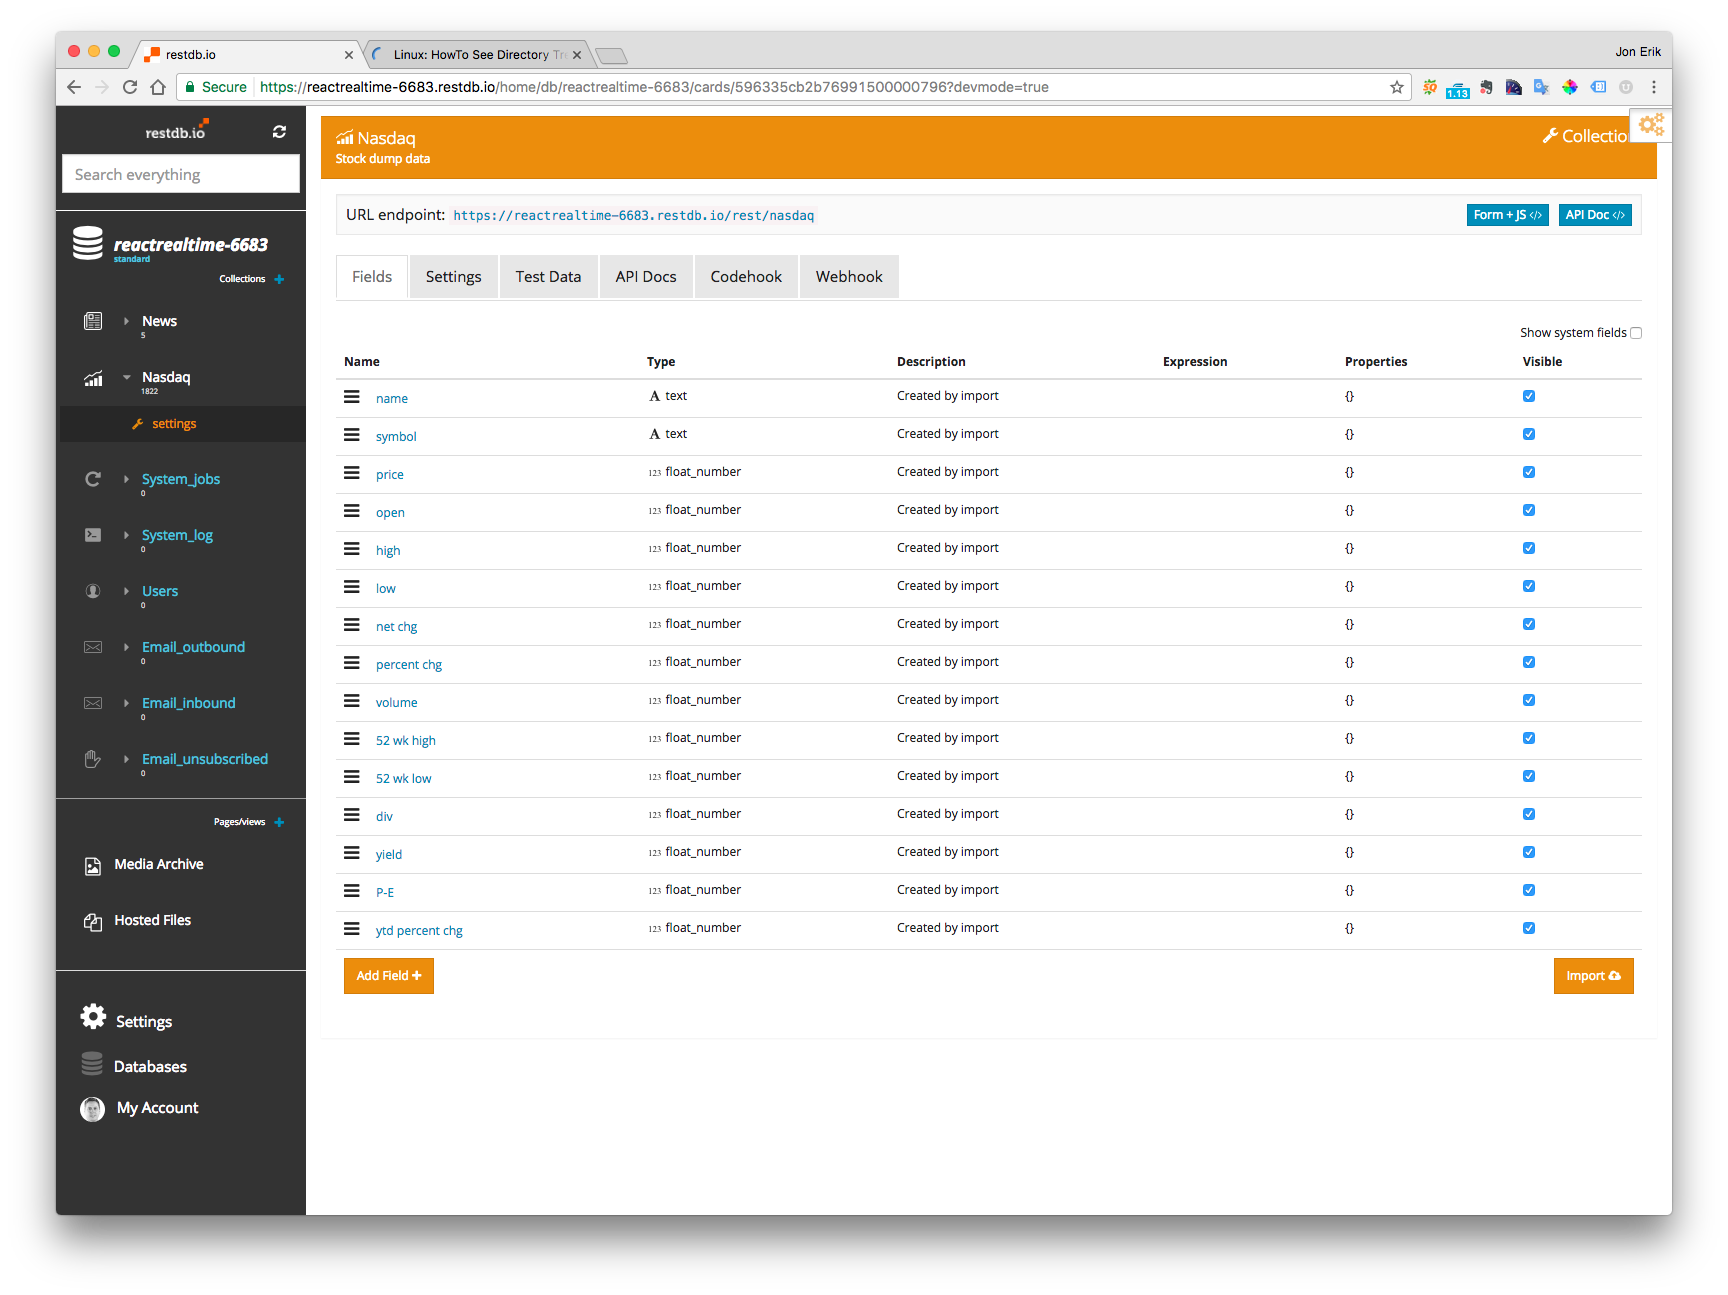
This gives us the following REST endpoint for our stock data:
https://reactrealtime-6683.restdb.io/rest/nasdaq
Which will output a JSON document like the following:
{
    _id: "596335cd2b769915000007a6"
    name: "1st Constitution Bancorp"
    symbol: "FCCY"
    open: 17.3
    high: 17.5
    low: 17.25
    net chg: null
    percent chg: null
    volume: 2
    52 wk high: 20.85
    52 wk low: 11.83
    div: 0.2
    yield: 1.16
    P-E: 15.83
    ytd percent chg: -7.75
    price: 17.25
},
...
Secure CORS
In order to allow clients to communicate with our database we must create a CORS api key with a connection profile. The secure CORS key is created in restdb.io under the database settings section:
The screen shot below shows the set up of both REST and Realtime:
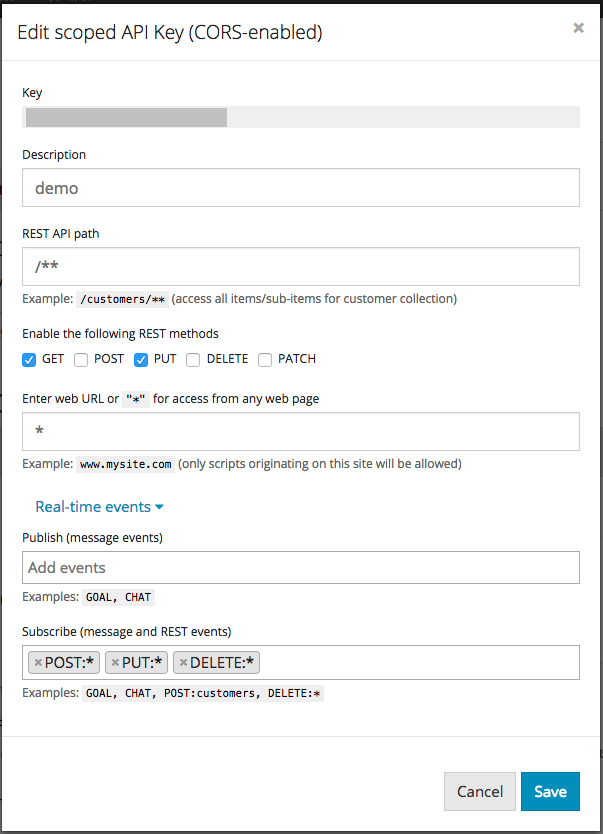
The settings above reads like this:
- Allow client to send
GET PUTREST API operations from*(any) domain. - Allow client to listen for realtime events on
POST PUT DELETEoperations to:*(any) collection
The database is now ready, and we can move on to create our React application.
Create the React application
The application consist of 3 main source files (in addition to React files and html,css ..)
helper.js- global settingsApp.js- App component, Ticker component for stock list and realtime changesAutotrader.js- Trade component for sending emulated stock price changes to the database
Global settings
To keep things DRY we'll create a helper file helper.js which will contain our global application settings.
// helper.js
import axios from 'axios';

// CORS enabled apikey
const apikey = '5x5fx501xfcex9e87x11ex6x';

// Autotrade delay
const trade_delay = 10000; // millis

// REST endpoint
let restdb = axios.create({
    baseURL: 'https://reactrealtime-6683.restdb.io',
    timeout: 1000,
    headers: { 'x-apikey': apikey }
});
// Eventsource endpoint
const realtimeURL = `https://reactrealtime-6683.restdb.io/realtime?apikey=${apikey}`

export { apikey, restdb, realtimeURL, trade_delay };
Main App component
In our App.js file we have 2 components, App and Tickers. App is the main component with the App container, and Tickers renders the stock list data and refreshes on realtime changes.
The code snippet below show the main container of our application, a heading and two components, Trade and Tickers.
class App extends Component {
componentDidMount() {
// start trading
}
render() {
return (
<div className="App">
<div className="App-header">
<img src={logo} className="App-logo" alt="logo" />
<h2>React & RestDB.io in Realtime</h2>
</div>
<h2>Nasdaq trading bots <small>fake</small></h2>
<Trade/>
<Tickers/>
</div>
);
}
}
Connecting the Eventsource to a realtime stream
We can listen for realtime database changes via the browser EventSource API.
// connect to the realtime database stream
let eventSource = new EventSource(`https://reactrealtime-6683.restdb.io/realtime?apikey=${apikey}`);
To make sure the connection is valid you can view the live stream from your browser network inspector, shown in the screen shot below:
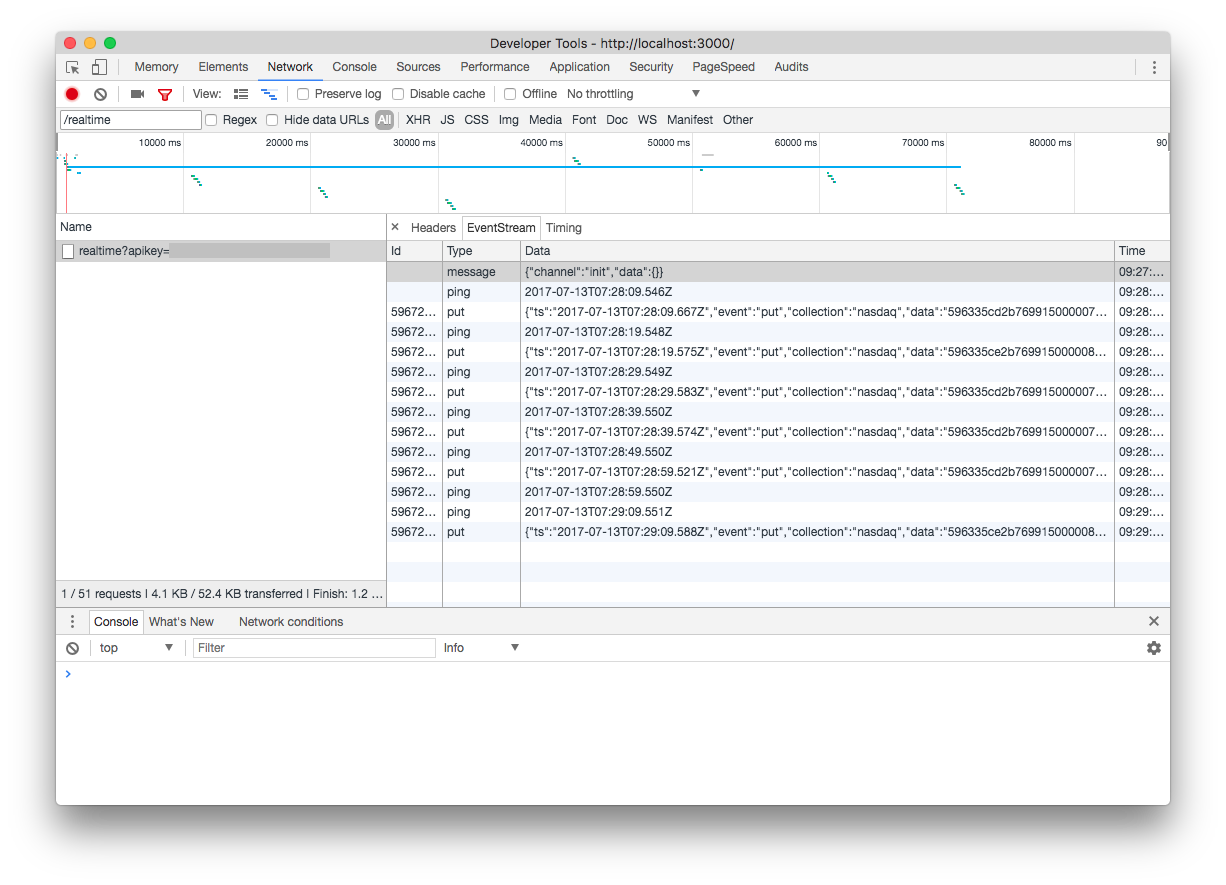
The inspector shows that we are receiving server events for putand ping. The putevents are changes in our nasdaqdata collection. And the ping events are keep-alive messages from the server. We will use this to make sure we can re-connect to the EventSource if/when the client loose connection to the server.
The trick is to store a time stamp for the last pingmessage. This code snippet shows how we add this to the component state:
// listen on ping from server, keep time
eventSource.addEventListener('ping', function(e) {
    this.setState(previousState => {
      return {ping: new Date(e.data)};
    });
}.bind(this), false);
We can now, in an interval, check how long time has passed since the client last got a ping message from the server. If that time span is too long (e.g. 20 sec), we re-connect our client.
// check if the realtime connection is dead, reload client if dead
setInterval(() => {
  let now = new Date().getTime();
  let diff = (now - this.state.ping.getTime()) / 1000;

  // haven't heard from the server in 20 secs?
  if (diff > 20) {
    // hard reload of client
    window.location.reload();
  }
}, 10000);
The Ticker component
The Ticker component retrieves stock data from the database. It also listens for realtime events when data has changed.
// App.js
import React, { Component } from 'react';
import _ from 'lodash';
import logo from './logo.svg';
import './App.css';
import Trade from './Autotrader';
import { restdb, realtimeURL } from './helper.js';


class Tickers extends Component {
  constructor(props) {
    super(props);

    this.state = {ping: new Date(), evt: '', tickers: []};

    // connect to the realtime database stream
    let eventSource = new EventSource(realtimeURL);

    // check if the realtime connection is dead, reload client if dead
    setInterval(() => {
      let now = new Date().getTime();
      let diff = (now - this.state.ping.getTime()) / 1000;

      // haven't heard from the server in 20 secs?
      if (diff > 20) {
        // hard reload of client
        window.location.reload();
      }
    }, 10000);

    // listen on ping from server, keep time
    eventSource.addEventListener('ping', function(e) {
        this.setState(previousState => {
          return {ping: new Date(e.data)};
        });
    }.bind(this), false);

    // listen for database REST operations
    eventSource.addEventListener('put', (e) => {
        this.getTickerData()

    }, false);

  }

  // GET 20 stocks to display and trade
  getTickerData = () => {
    restdb.get("/rest/nasdaq?sort=symbol&max=20&metafields=true")
      .then(res => {
        let now = new Date().getTime();
        let tickers = res.data;
        let diff = null;

        // tag stocks that are changed in the last 10 secs
        _.each(tickers, (t) => {
          diff = (now - new Date(t._changed).getTime()) / 1000;
          if (diff < 10) {
            t.isChanged = true;
          } else {
            t.isChanged = false;
          }
        });

        this.setState(previousState => {
          return { tickers };
        });
      });
  }
  componentDidMount() {
    console.log("Start client");
    this.getTickerData();
  }

  render() {
    return (
      <div className="tickers">
        <table className="table">
          <thead>
            <tr>
              <th>Symbol</th>
              <th>Company</th>
              <th className="num">Price</th>
              <th className="num">Change</th>
            </tr>
          </thead>
          <tbody>

            {this.state.tickers.map(tic =>

              <tr key={tic._id} className={tic.isChanged ? (tic['net chg'] > 0 ? "up" : "down") : "passive"}>
                <td>{tic.symbol}</td>
                <td>{tic.name}</td>
                <td className="num">{tic.price.toFixed(2) || 0.0}</td>
                <td className="num">{tic['net chg'] ? tic['net chg'].toFixed(2) : 0.0}</td>
              </tr>
            )}

          </tbody>
        </table>
      </div>
    );
  }
}
The Trading component
Our last file Autotrader.js contains one component Trade. The component sends updates (PUT) to a random stock from the list each 10th second.
import React, { Component } from 'react';
import { restdb, trade_delay } from './helper.js';

// emulate price change on stocks
class Trader extends Component {
    constructor(props) {
        super(props);
        this.state = {stocks: [], lasttrade: null};

        // GET 20 stocks
        restdb.get("/rest/nasdaq?sort=symbol&max=20")
        .then(res => {
            const stocks = res.data;
            this.setState(previousState => {
                return { stocks };
            });
        });

        // update a random stock each 10 sec
        setInterval(() => {
            let stockpos = Math.floor(Math.random() * 19);
            if (this.state.stocks[stockpos]) {
                let stockID = this.state.stocks[stockpos]._id;
                let newprice = (Math.random() * 1000.0) + 1.0;
                // PUT new price on one stock
                restdb.put(`/rest/nasdaq/${stockID}`,
                    {price: newprice}
                )
                .then((response) => {

                    this.setState(previousState => {
                        return {lasttrade: response.data};
                    });
                })
                .catch(function (error) {
                    console.log(error);
                });
            }
        }, trade_delay);
    }

    render() {
        return (
        <div className="autotrade">
            <p>Trading: {this.state.lasttrade ? (this.state.lasttrade.symbol + ' at ' + this.state.lasttrade.price.toFixed(2)) : 'none'}</p>
        </div>
        );
  }
}

export default Trader;
Server Codehook for validation of stock price change
Our final piece of code is for server side validation of PUT operations against our nasdaq database collection.
We will create a database Codehook that triggers on beforePUT. This function validates that the new price if not negative, and it calculates the diff between the new and the old price. The diff is then stored in a property called ['net chg'].
// Codehooks for nasdaq
function beforePUT(req, res) {

    // fetch old value first
    let query = {_id: req.body._id};
    let hint = {};

    db.get("/rest/nasdaq", query, hint, function (err, result) {

        // set the delta value as old - new value
        req.body['net chg'] = req.body.price - result[0].price;
        req.body.price = Math.max(req.body.price, 0.0);
        // return the updated document
        res.end({"data": req.body});
    });

}
This concludes our simple React application. The next step is to run and test it locally and then deploy it to the restdb.io server.
Run application from a local Node.js server
If you install Node.js on your local machine you can take advantage of the rapid development cycle with hot code re-loading and debugging.
The create-react-app npm package has a command that spins up a Node server on our local machine.
# start a local node.js server
npm start
You should see something like this output in your terminal window:
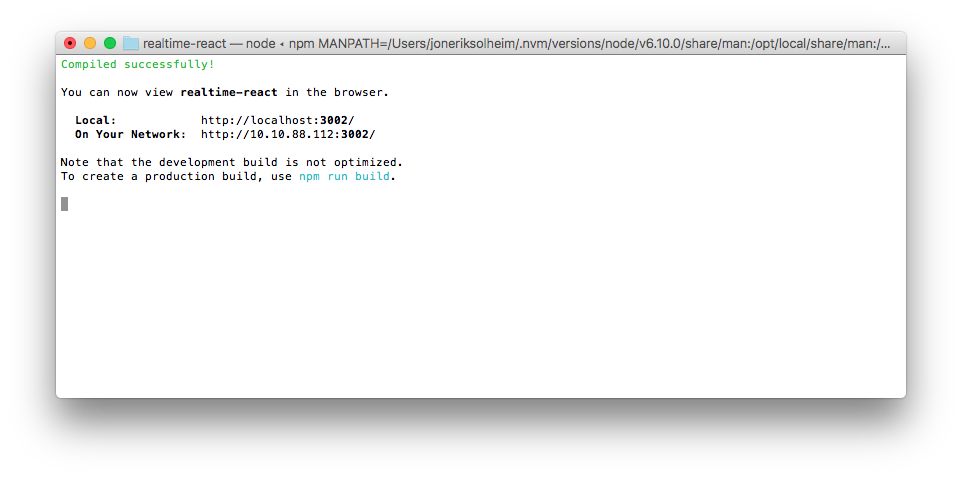
You can now test you app from http://localhost:3000.
Build application
To create a packaged application that can be deployed, you can use the handy build command.
npm run build
After the build you should see something similar to this:

Run static file server to test build
You can also test your deploy-ready package on a local HTTP server. Here we use the npm package serve:
serve -s build
You should see this output in the terminal window:
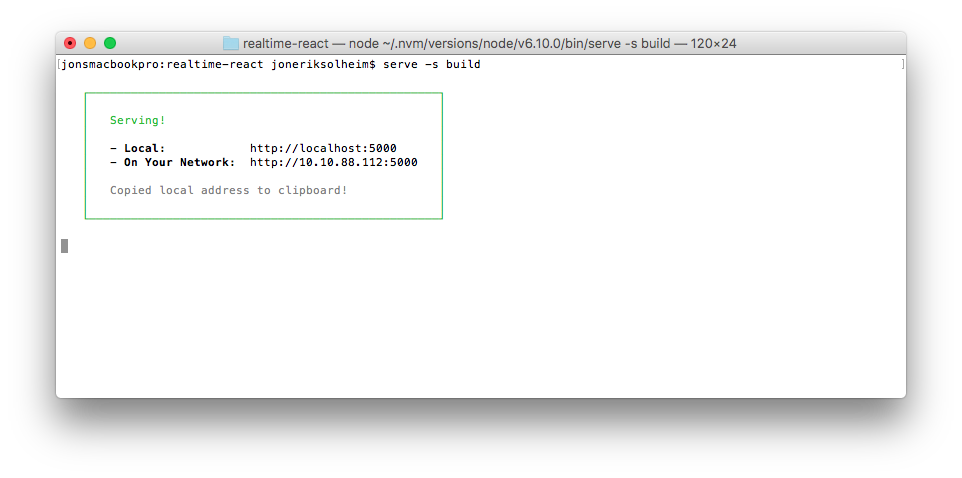
You can now test you deployment app package from http://localhost:5000.
Our final step is to deploy our application to the world. We can deploy our React app to a variety of HTTP servers, but in this example we'll be using the restdb.io server. Loading the app from the same server/domain that contains the data gives us a significant speed improvement.
Deploy application to restdb.io
restdb.io has a built in web server that lets you deploy and serve static files.
E.g. https://<yourdbname>.restdb.io/static
You can deploy to your database with the restdb-cli command line tool.
To deploy our React app, we run the following command:
restdb-cli --cmd upload --src ./build --dest /reactapp --database reactrealtime-6683 --apikey
<your full access api-key here>
However, a much better approach is to add this as a deployment command to our application package.json file instead.
Also, adding relative paths to the build folders lets us deploy both locally and to a server with a different folder structure.
We do this by setting the "homepage": "." property in the package.json file.
Our final package.json file looks like this:
{
    "name": "realtime-react",
    "version": "0.1.0",
    "private": true,
    "homepage": ".",
    "dependencies": {
        "axios": "^0.16.2",
        "lodash": "^4.17.4",
        "react": "^15.6.1",
        "react-dom": "^15.6.1",
        "react-scripts": "1.0.10"
    },
    "scripts": {
        "start": "react-scripts start",
        "build": "react-scripts build",
        "test": "react-scripts test --env=jsdom",
        "eject": "react-scripts eject",
        "deploy": "restdb-cli --cmd upload --src ./build --dest /reactrealtime --database reactrealtime-6683 --apikey <your full access api-key here>"
    }
}
Lets run the deploy command.
npm run deploy
If all goes well, it should display something like this:
> realtime-react@0.1.0 deploy /Users/joneriksolheim/projects/react-demo/realtime-react
> restdb-cli --cmd upload --src ./build --dest /reactrealtime --database reactrealtime-6683 --apikey xxxxxxxxxxxxxxxxxxx


Upload successful!  3398298 total bytes uploaded
The deployed application is now served from restdb.io server at this URL:
https://reactrealtime-6683.restdb.io/static/reactrealtime/build/index.html
Conclusion
Coding a realtime app with React is fun, and a lot easier than you might think. Simple state management with automatic DOM sync makes our code clean and small. Using the browsers standard EventSource API to listen for realtime data events are both simple and effective. And finally, using Axios for REST communication just rocks.
View full source code on GitHub here.
