


What is a transactional email anyway?
Transactional emails are just emails triggered from a user's action (wikipedia). Such as a welcome email after you sign up to a new service, or a weekly summary of your account with the same service. You can read more about this topic in this interesting article from mailtrap.io.
restdb.io mail API
Before we begin, lets take a quick walkthrough of how to use the restdb.io mail API. Any restdb.io database has a REST endpoint for sending email. If your database is called mydbname, the endpoint is:
https://<mydbname>.restdb.io/mail
And from your application you can POST a JSON document with these properties:
{
    sendername: "Acme customer support",
    subject: "Important message",
    to: "jones@arc.com,
    html: "<h1>Mr. Jones!</h1><p>We found the ..."
}
Programmatic email could not be any simpler. You can read more in the docs here.
Now that we understand how to send emails via the REST API, lets dive into the details of sending transactional emails.
Transactional email
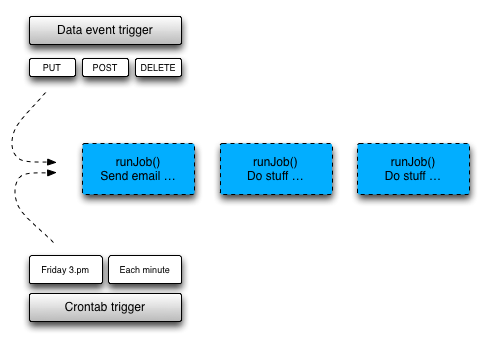
In restdb.io you can build rules and automate stuff with two different methods:
- Background tasks (crontab triggers)
- Data events (REST triggers)
The illustration below shows how different triggers can start actions in your application:
Lets start off by deciding which rules we want for our application.
Rules / triggers
- Send a welcome email to new Customers
- When a new Customer record is created (
POST)
- When a new Customer record is created (
- Send an email to all Customers with changed status
- When an existing Customer record status changes (
PUT)
- When an existing Customer record status changes (
- Send an email to special Customers each week
- Find all customers with (
purchases > $10.000)
- Find all customers with (
Data schema
For this example we'll use a simple Customer collection as a base for our application. The data schema has 4 datafields; name, status, email and purchased.
Sample data from the Customer collection:
[
    {
        _id: "589af0d26193d40e00000620",
        name: "Padberg LLC",
        status: "new",
        email: "Joaquin.Lynch@padberg.org",
        purchased: 1486
    },
    {
        _id: "589af0d26193d40e00000621",
        name: "Fisher and Sons",
        status: "active",
        email: "Krajcik_Luella@fishsons.info",
        purchased: 1644
    }
    …
]
The data in the Customer collection will be the basis for our transactional emails.
How do I create the rules for my transactional emails in restdb.io?
The answer to that question is Codehooks. Codehooks are JavaScript functions which can intercept REST API calls to your database, or even run as background jobs to perform tasks at specific times or intervals.
Lets go ahead and implement our triggers and rules.
Rule - welcome each new customer
For this rule, we create a Codehook that executes after a Customer is created (read POST).
In the Codehook language that translates to the afterPOST function. The JavaScript function shown below has 3 important steps:
- Get an email template from the database
- Merge the email template with the Customer record that is
POST'ed - Send the HTML email to the Customer
function afterPOST(req, res){
    // 1. load an email template from the database
    db.get('/rest/emailtemplates',{title: "Welcome"}, {}, function(error, data){

        // 2. merge record with email template
        var htmlmail = template(data[0].template, req.body);
        var mailopt = {
          to: req.body.email,
          subject: "Welcome",
          html: htmlmail,
          company: "Acme Inc",
          sendername: "Acme customer support"
        };

        // 3. send email
        sendMail(mailopt, function(error, body){
            // end Codehook normally
            res.end();
        });
    });
}
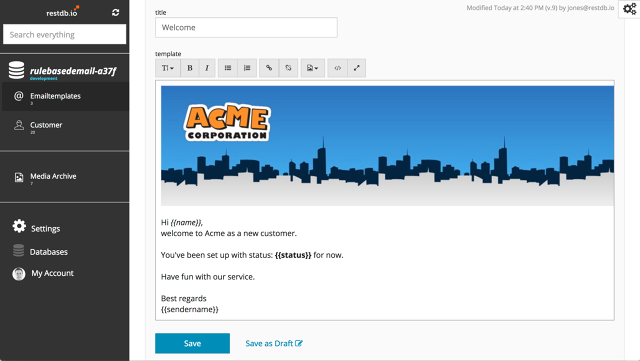
1. Email template
To help manage your email templates you can use a separate collection for storing the templates. In this example we've made a collection with two fields: title and template (richtext / HTML). This makes it much easier to maintain your growing list of different templates for transactional emails. The screenshot below shows our example welcome email.
2. Merge data
To merge the Customer data with a template we use Handlebars. This is done with the API function template(template_string, record) available from your Codehook.
This returns a complete HTML string with the Customer data merged into the Handlebars fields (e.g. {{name}}).
3. Send email
The last step sends the data string via the Codehook sendMail(…) API.
The result of the 3 steps above is that new Customers will get a nice email (screenshot below) from your application (automatically):

Rule - notify a customer when the status changes
The second rule is a slight variation of the first. We trigger this email on PUT operations instead of POST, and we check that the status has changed. If the status has changed, we send an email based on another template.
function afterPUT(req, res){
    // 1. load an email template from the database
    db.get('/rest/emailtemplates',{title: "Status"}, {}, function(error, templatedata){

        // 2. check status (trick from beforePUT that stores the last status)
        if (req.body.status === req.body._laststatus) {
            log.info("No mail for unchanged status");
            res.end();
            return;
        }

        // 3. merge record with email template
        var signature = "Acme customer support";
        req.body.sendername = signature;
        var htmlmail = template(templatedata[0].template, req.body);

        var mailopt = {
          to: req.body.email,
          subject: "New status",
          html: htmlmail,
          company: "Acme Inc",
          sendername: signature
        };
        // 4. send email
        sendMail(mailopt, function(error, body){
            // normal end
            res.end();
        });
    });
}
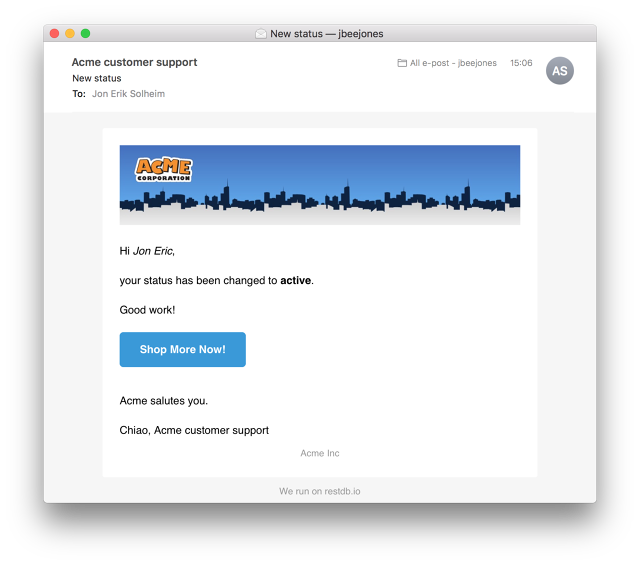
This template uses the same layout but has an additional Call-to-action button in the center.
Rule - weekly mail to Premium customers
The third rule uses a background job to find and send emails to premium customers.
A background job must implement the runJob(…) function. This function is executed by a crontab expression.
The code for our background job is shown below:
function runJob(req, res){
    // 1. get email template
    db.get('/rest/emailtemplates',{title: "Premium"}, {}, function(error, templatedata){
        // 2. get premium customers
        db.get('/rest/customer',{"purchased": {"$gte": 10000}}, {}, function(error, result){

            var emails = [];
            for (var i in result) {
                result[i].sendername = "Acme customer support";
                var htmlmail = template(templatedata[0].template, result[i]);
                var mailopt = {
                  to: result[i].email,
                  subject: "Weekly premium offer",
                  html: htmlmail,
                  company: "Acme Inc",
                  sendername: "Acme customer support"
                };
                emails.push(mailopt);
            }
            // 3. send email array
            sendMail(emails, function(err, mailres){
                res.end();
            })
        });
    });
}
The main difference with this function compared to the two first is that this uses a database query to find a list of customers. Based on this list it produces an array of email objects. It then sends this array to the sendMail(…) API instead of just a single email.
Crontab expression:
All background jobs are stored in a system collection System_jobs (screenshot below). The crontab field specify when this job should run. In our case we want it to run at the end of each work week.
For example:
0 15 * * 5 equals “At 15:00 on Friday” (Tip: crontab.guru)
And the script field contains the JavaScript code to execute each time the job runs.
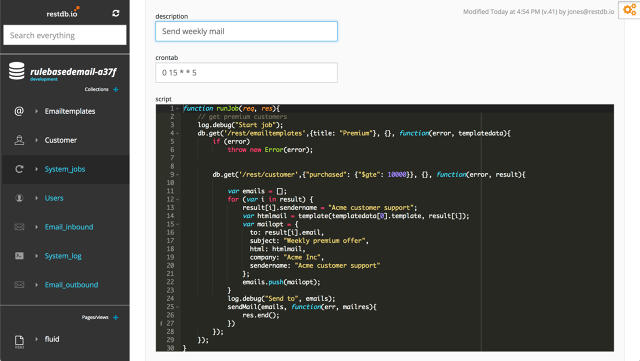
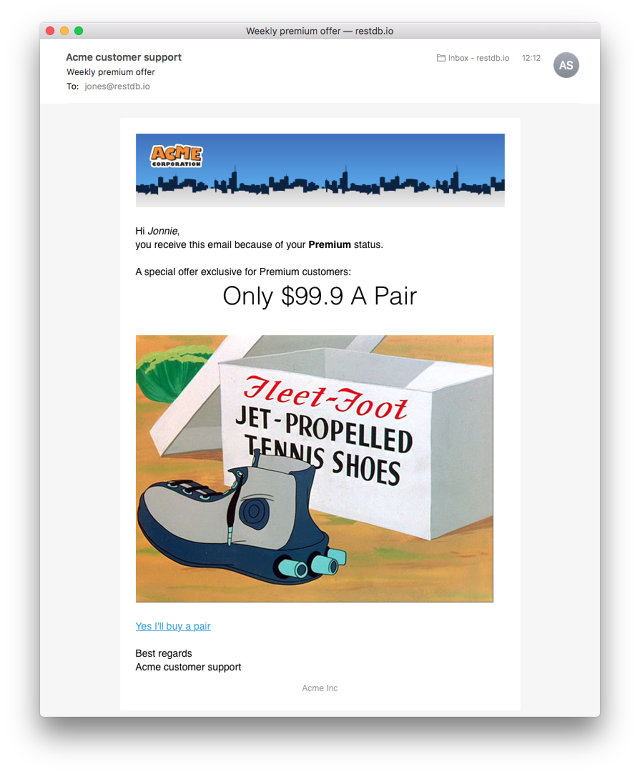
The final result of our weekly job is that every premium customer gets this email (screenshot below) on every friday afternoon at 3 pm.
Summary
This blog post has shown how transactional email can be fully automated in your restdb.io database. It also shows the power of combining dynamic templates with your database content to produce personalized messages.
We have created a complete database template for this example. If your have an account already, you can install it here. If not, you can sign up here. Have a look at the details and play around with it to learn how you can automate emails in your own application.
